This div will be replaced

Saturday, December 1, 2012

Week 8 - SPSS

WHAT IS SPSS?

As for this week I am going to make use of animation in explaining "SPSS".
It is going to be my first time using this tool though.
Hope it will work out just fine.
...

Below are some of the links that might be helpful regarding SPSS :


 1. http://www.hmdc.harvard.edu/projects/SPSS_Tutorial/spsstut.shtml

2. http://www.psych.utoronto.ca/courses/c1/spss/page1.htm

3. http://www.ats.ucla.edu/stat/spss


Thanks for watching.
Come back again anytime.

Wednesday, November 28, 2012

Week 6 - Survey Monkey

What is Survey Monkey?


How to use this Survey Monkey tool?


To get started, just follow the following steps. And don't worry you wont be lost.

1. Firstly .....


Just go to Survey Monkey URL (http://www.surveymonkey.com). 
Sign up for the Basic survey which is free and permits 100 responses per survey. 
With the free version, you are only allowed 10 questions per survey and many features are disabled, such as adding a custom logo, among many other features.

2. Next .....


Click the icon that says "Join Now for Free," and it will allow you to pick a username and password, and you will be required to enter your contact Email address. 

3. Later .....


You can follow the directions on the screen to begin creating your survey. 
For more information on creating your account and designing your first survey, go to http://www.surveymonkey.com/Home_Videos.aspx to view a video to aid you with Survey Monkey. 

And you're done
Now you can act as if you are a pro researcher among your pets haha..

Wednesday, October 31, 2012

Week 7 - Survey & Questionnaire

Learning on Survey & Questionnaire 

As for this week I am going to implement what we call as a 'Survey' or 'Questionnaire' in my learning blog. Do hope that you guys could spare a little time on this survey of mine will you. Thanks.


Wednesday, October 17, 2012

Week 5 - Web 2.0 in Education

Web 2.0 In Education


Below are some examples of Web 2.0 that can be used in aiding teachers to fulfill the needs of having a more creative and interesting ways of influencing pupils to indulge and participate with the subjects taught in the classroom.

1. Voicetread ---------------------------------------------------


A VoiceThread is a collaborative, multimedia slide show that holds images, documents, and videos and allows people to navigate slides and leave comments in 5 ways - using voice (with a mic or telephone), text, audio file, or video (via a webcam). Share a VoiceThread with friends, students, and colleagues for them to record comments too.

2. QR Codes ---------------------------------------------------
 
These black and white pixelated squares can be found on TV, in magazines, and now in classrooms. Using a mobile device with a camera such as a smart phone, iTouch, iPad or free software downloaded on a computer, a QR code can be quickly created to link directly to text, images, or web addresses.  Try it yourself by scanning QR code below:


Don’t have a QR reader? Type getscanlife.com into your Internet browser on your mobile device to download a free QR reader.  Now imagine using this in your classroom by linking to online resources, creating a scavenger hunt, providing the answers to quiz questions, or extending art room learning by sending students home with QR code resources.

3. Animoto ---------------------------------------------------


Want to look like a master movie-maker? Simply upload images or video clips, select music, and click to create an amazing movie.  Just by registering for an educator account you get access to full-length movies without paying a dime.

4. Blabberize ---------------------------------------------------


What isn’t funny about an artificial talking mouth?  Start with any portrait, define the mouth area, and talk.  The mouth will follow your voice. Use Blabberize to present information about an artist, convey classroom rules, or give studio instruction.  While this may not change your teaching world, incorporating Blabberize into your lessons can certainly enhance instruction and get the students to take notice. 

5. Ipopetz ---------------------------------------------------


Create a 3-D mini cartoon show. Select a puppet, create the story, and record a show that is ready to share. This tools is useful when you would like to initiate more of their visual and creative thinking skills in the classroom.

6. Wordia ---------------------------------------------------

 
Wordia is a free games-based learning platform - built on the foundations of a dictionary - that blends word-based learning games with interactive video vocabulary. Wordia encourages students to learn through play - building subject ‘Word Banks’ as they compete with classmates and other schools in a fun, competition-led, learning environment.


To conclude, these implementation of Web 2.0 tools within the education field indeed have brought upon great changes in term of the way of teaching from a conventional methods that usually used chalk and talk to a more modernized methods such as Educreations

Surely this strategy of adapting Web 2.0 tools within the education field is not a waste of time as it may not only could initiate a more critise and creative thinking in the children (even the adult are eager to learn) but also it could create a new kind of environment that is more comfortable with nowadays era.

Week 4 - 21st Century Skills

 21st Century Skills

Living in today fast track ICT era one need to really have a grasp on the their surrounding in achieving targeted goals or objectives in their lives.


Definitions :


These skills have been adopted in various part of knowledge to sharpen up the community mainly in education as these would help a lot to the nation building. Within learning itself these skills are divided into various categories as there have become essential and for some part as a crucial part to develop one learning. Such categories are :

    1. Critical Thinking & Problem Solving
    2. Creativity & Innovation
    3. Communication & Collaboration
    4. Visual Literacy
    5. Scientific & Numerical Literacy
    6. Cross-Disciplinary Thinking
    7. Basic Literacy

Now just have a quick go on the points shall we.

---- 1. CRITICAL THINKING AND PROBLEM SOLVING ----

a) Reason Effectively

  • Use various types of reasoning (e.g., inductive, deductive, etc.) as appropriate to the situation

b) Use Systems Thinking

  • Analyze how parts of a whole interact with each other to produce overall outcomes in complex systems

c) Make Judgments and Decisions

  • Effectively analyze and evaluate evidence, arguments, claims and beliefs
  • Analyze and evaluate major alternative points of view
  • Synthesize and make connections between information and arguments
  • Interpret information and draw conclusions based on the best analysis
  • Reflect critically on learning experiences and processes

d) Solve Problems

  • Solve different kinds of non-familiar problems in both conventional and innovative ways
  • Identify and ask significant questions that clarify various points of view and lead to better solutions

 --------------- 2. CREATIVITY AND INNOVATION ---------------

a) Think Creatively

  • Use a wide range of idea creation techniques (such as brainstorming)
  • Create new and worthwhile ideas (both incremental and radical concepts)
  • Elaborate, refine, analyze, and evaluate ideas in order to improve and maximize creative efforts
  • Demonstrate imagination and curiosity

b) Work Creatively with Others

  • Develop, implement, and communicate new ideas to others effectively
  • Be open and responsive to new and diverse perspectives
  • Demonstrate originality and inventiveness in work and understand the real world limits to adopting new ideas
  • View failure as an opportunity to learn; understand that creativity and innovation is a long-term, cyclical process of small successes and frequent mistakes

c) Implement Innovations

  • Act on creative ideas to make a tangible and useful contribution to the field in which the innovation will occur

------- 3. COMMUNICATION AND COLLABORATION ------

a) Communicate Clearly

  • Articulate thoughts and ideas effectively using oral, written, and nonverbal communication skills in a variety of forms and contexts
  • Listen effectively to decipher meaning, including knowledge, values, attitudes, and intentions
  • Utilize multiple media and technologies, and know how to judge their effectiveness a priori as well as assess their impact

b) Collaborate with Others

  • Demonstrate ability to work effectively and respectfully with diverse teams
  • Exercise flexibility and willingness to be helpful in making necessary compromises to accomplish a common goal
  • Assume shared responsibility for collaborative work, and value the individual contributions made by each team member

------------------------- 4. VISUAL LITERACY ------------------------

  • Demonstrate the ability to interpret, recognize, appreciate, and understand information presented through visible actions, objects and symbols, natural or man-made

-------- 5. SCIENTIFIC AND NUMERICAL LITERACY -------

  • Demonstrate the ability to evaluate the quality of scientific and numerical information on the basis of its sources and the methods used to generate it
  • Demonstrate the capacity to pose and evaluate scientific arguments based on evidence and to apply conclusions from such arguments appropriately
  • Demonstrate ability to reason with numbers and other mathematical concepts

------------- 6. CROSS-DISCIPLINARY THINKING ------------

  • Apply knowledge, attitudes, behaviors, and skills across disciplines in appropriate and effective ways

-------------------------- 7. BASIC LITERACY -------------------------

  • Demonstrate the ability to use language to read, write, listen, and speak

Friday, September 28, 2012

Week 3 - Google Drive

Google Drive - Another Cloud Storage

Greetings fellow friends. For this week Computer In Education class, I have been exposed to another cloud storage in the net society which goes by the name Google Drive. Even though we are not entirely poking around with its button and browsing around with its features yet (as we are only focusing on writing our assignment with Google Doc), but in time we will have the opportunity to do so and discussed it in this blog.
 
 
A little about Google Drive. As said earlier it is one of the many cloud storage offered on the net for us the user to store data (file, music, video etc.) in the worldwide web and of course the same benefits like its other competitors. This Google Drive application has make it self a little bit unique from its competitors by providing few document oriented application that can be use on the go.

 
Such applications that can be found in this Google Drive are Document, Spreadsheet, Presentation, Form, Drawing etc. These provided applications are intended to reduce the time and increase the productivity of its user by only using their Google Account to complete their work task (No need to open another software to do separate tasks is just what come in their Google mind I would say).


Any job can be completed by using this application provided by Google Drive such as writing your assignment on Google Doc, key in your data with Google Spreadsheets and many more. However there is a little glitch about these applications though for those users who have been familiarized with Microsoft Office. Why? If you could look closely these apps have the similarities with those of Microsoft Office but the only lacking parts is the apps features. Not all features from Microsoft being adapted into this newly found apps as it may result in more probs such as taking more loading time just to execute an app.


Above all, this apps provided by Google Drive seems has indeed prove it worthiness to be with other stand tall cloud storage out there such as those of Droxbox, Amazon S3, Microsoft Windows Azure Blob Storage, Box, & Minus. Compliment should be given to Google as they tries to make their users' experiences in using familiarized software such as Microsoft Office into their engines, Mini Office don't you think.

That is all for this week writing. Until next time and have a good day.

Sunday, September 23, 2012

Week 2 - Links In Yahoo! Group

Creating Links in Yahoo! Group

This is going to be my second post for this week mainly regarding on Creating Links in Yahoo! Group. This is due to our First Self Learning Assignment where all pupils that take Computer In Education class should by any means get their hands on the task starting last week. So hopefully this writing of mine would be able to help those pupils (including me) in completing the task.


Well as you browse into GE1155 2012-2013, you should be able to see a tab on the left side of the screen which consists of several items. However what we are going to focus on today is on the button Links.

Step I
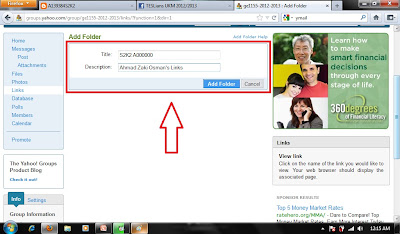
So as the first step, click the Links button and a new screen shall appear (above pictures for guidance). There you shall acknowledge two button, Add Links and Add Folder on the very top of the new screen (above picture - no.2 arrow).

Right now we are in need of a folder as we are going to add our Links into that folder. So clicking Add Folder button will be our next step.


As a result you shall be asked to fill in Title (just write down your Class Set followed by Group Number and your Matrix Number) & Description (your full name + Links would be sufficed) before you could proceed to our next step.


 And Boom! your folder is ready to be use. Don't worry if you've write it wrongly though as you can always do corrections by clicking at the Edit button at the right side of your respective folder.


 Step II

Now that we have done creating our folder, it is time to add our Links in it. And here we go (please click your newly created folder to proceed though).


Still remember this interface and those two buttons (Add Link & Add Folder)? What we are going to do now is that we are going to add our designated Links (Blog Link, Facebook Link, Facebook Group Link & Yahoo! Group Link) into this folder. Simply clicking the Add Link button and off we go.


Here you will be asked to fill in some blanks which consists of Title, Description and URL.

For the Title :
- Write down your Links name. 
eg. Blog, Facebook, Facebook Group or Yahoo! Group.

For the Description :
- Write down your name + Blog/Facebook/Facebook Group/Yahoo! Group at the back of your name.
eg. Ahmad Zaki Osman's Blog.

For the URL :
- Just paste your designated Blog / Facebook / Facebook Group / Yahoo! Group URL here.
 eg. http://a139384s2k2.blogspot.com.
 
As you have finished with that just click the Add Link button.


And here it is the result. You now have successfully created a Link in your folder. If let say you wanted to add more links in your folder just repeat the above Step II.


If you have done it correctly you should have something like the above picture. Great isn't. Do you notice that they are three buttons at the right side of each links (the Edit, Delete and Cut button)? Well each of them have a very special task to be done. Do say that you wanted to delete you links, just simply click the Delete button would do the trick. Or you wanted to edit or cut your links (that is you wanted to share or paste them somewhere else), clicking the Edit or Cut button respectively would be suffice.

Saturday, September 22, 2012

Week 2 - Dropbox Data Sharing

Dropbox Data Sharing

This writing shall be regarding this week Computer In Education class which was on data sharing using Dropbox. For you guys that are still new in web surfing (we are in the same boat actually), Dropbox is one of those application that enables its user to store their data (in the form of files, pictures, music, video etc.) in a cloud storage in the web. 

This data can be viewed or collected by the user afterwards by using any possible internet connected computer. Indeed it sounds awesome, to be able to be connected with our data with any computer anytime anywhere.

 
To start off one need to download the Dropbox software (click here to download) and install it in those computers that one wish to be connected with the web. As the installation have finished, there will be a new folder that shall be created by default in the computer. 


If you have any data that you wish to share with friends on the net or rather simply wanted to store it in the cloud, just drag or copy the data into this default folder as it will act as a connecter to the net.


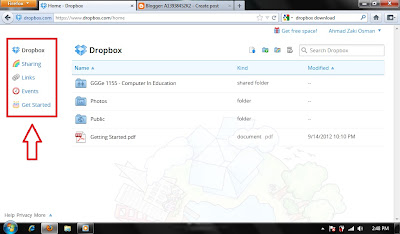
There is also an alternative way of sharing data by using Dropbox. As you have registered as a member, you shall be able to surf and enjoy its features (https://www.dropbox.com). Here you will see a vertical tab on the left side of the web that consist of :
  • Dropbox 
  • Sharing 
  • Links 
  • Events 
  • Get Started
To start sharing your data, simply click the Sharing button on the left side on the tab and you shall be guided throughout the whole process (there are no such things as to be lost here though). 


If you feel that you wanted your uploaded data to be private such that you are the only person that can viewed the data, you can just simply move your cursor to the Option button at the side of your respective folder. There you are able to set your settings regarding your targeted folder base on your current needs. 


Let us just say that you need more information or rather wanted to explore Dropbox features but does not know where to start from, just click the Get Started button on the left tab and choose first option, Take the Dropbox Tour. For me the tour itself seem to be enjoyable and simple enough for new user to understand.

To conclude, Dropbox really is one of many data storage applications on the net that really helps us user in term of getting in touch with our data regardless of our whereabouts, which suit its tagline “Your life’s work, wherever you are”. That’s mark the end of my report for this week. Hope to see you guys again. Bye.