Dropbox Data Sharing
This writing shall be regarding this week Computer In
Education class which was on data sharing using Dropbox. For you guys that are
still new in web surfing (we are in the same boat actually), Dropbox is one of
those application that enables its user to store their data (in the form of
files, pictures, music, video etc.) in a cloud storage in the web.
This data can be viewed or collected by the user afterwards by using any possible internet connected computer. Indeed it sounds awesome, to be able to be connected with our data with any computer anytime anywhere.
This data can be viewed or collected by the user afterwards by using any possible internet connected computer. Indeed it sounds awesome, to be able to be connected with our data with any computer anytime anywhere.

To start off one need to download the Dropbox software
(click here to download) and install it in those computers that one wish to be
connected with the web. As the installation have finished, there will be a new
folder that shall be created by default in the computer.

If you have any data
that you wish to share with friends on the net or rather simply wanted to store
it in the cloud, just drag or copy the data into this default folder as it will
act as a connecter to the net.

There is also an alternative way of sharing data by
using Dropbox. As you have registered as a member, you shall be able to surf and
enjoy its features (https://www.dropbox.com).
Here you will see a vertical tab on the left side of the web that consist of :
- Dropbox
- Sharing
- Links
- Events
- Get Started

If you feel that
you wanted your uploaded data to be private such that you are the only person
that can viewed the data, you can just simply move your cursor to the Option
button at the side of your respective folder. There you are able to set your
settings regarding your targeted folder base on your current needs.

Let us just say that you need more information or
rather wanted to explore Dropbox features but does not know where to start from, just
click the Get Started button on the left tab and choose first option, Take the Dropbox
Tour. For me the tour itself seem to be enjoyable and simple enough for new
user to understand.
To conclude, Dropbox really is one of many data
storage applications on the net that really helps us user in term of getting in
touch with our data regardless of our whereabouts, which suit its tagline “Your
life’s work, wherever you are”. That’s mark the end of my report for this week.
Hope to see you guys again. Bye.
Creating Links in Yahoo! Group
This is going to be my second post for this week mainly regarding on Creating Links in Yahoo! Group. This is due to our First Self Learning Assignment where all pupils that take Computer In Education class should by any means get their hands on the task starting last week. So hopefully this writing of mine would be able to help those pupils (including me) in completing the task.

Well as you browse into GE1155 2012-2013, you should be able to see a tab on the left side of the screen which consists of several items. However what we are going to focus on today is on the button Links.
Right now we are in need of a folder as we are going to add our Links into that folder. So clicking Add Folder button will be our next step.
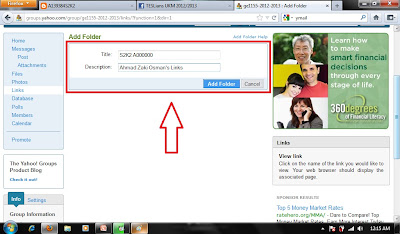
As a result you shall be asked to fill in Title (just write down your Class Set followed by Group Number and your Matrix Number) & Description (your full name + Links would be sufficed) before you could proceed to our next step.

And Boom! your folder is ready to be use. Don't worry if you've write it wrongly though as you can always do corrections by clicking at the Edit button at the right side of your respective folder.
Now that we have done creating our folder, it is time to add our Links in it. And here we go (please click your newly created folder to proceed though).

Still remember this interface and those two buttons (Add Link & Add Folder)? What we are going to do now is that we are going to add our designated Links (Blog Link, Facebook Link, Facebook Group Link & Yahoo! Group Link) into this folder. Simply clicking the Add Link button and off we go.

Here you will be asked to fill in some blanks which consists of Title, Description and URL.
For the Description :
As you have finished with that just click the Add Link button.

And here it is the result. You now have successfully created a Link in your folder. If let say you wanted to add more links in your folder just repeat the above Step II.

Creating Links in Yahoo! Group
This is going to be my second post for this week mainly regarding on Creating Links in Yahoo! Group. This is due to our First Self Learning Assignment where all pupils that take Computer In Education class should by any means get their hands on the task starting last week. So hopefully this writing of mine would be able to help those pupils (including me) in completing the task.

Well as you browse into GE1155 2012-2013, you should be able to see a tab on the left side of the screen which consists of several items. However what we are going to focus on today is on the button Links.
Step I
So as the first step, click the Links button and a new screen shall appear (above pictures for guidance). There you shall acknowledge two button, Add Links and Add Folder on the very top of the new screen (above picture - no.2 arrow).Right now we are in need of a folder as we are going to add our Links into that folder. So clicking Add Folder button will be our next step.

As a result you shall be asked to fill in Title (just write down your Class Set followed by Group Number and your Matrix Number) & Description (your full name + Links would be sufficed) before you could proceed to our next step.

And Boom! your folder is ready to be use. Don't worry if you've write it wrongly though as you can always do corrections by clicking at the Edit button at the right side of your respective folder.
Step II
Now that we have done creating our folder, it is time to add our Links in it. And here we go (please click your newly created folder to proceed though).

Still remember this interface and those two buttons (Add Link & Add Folder)? What we are going to do now is that we are going to add our designated Links (Blog Link, Facebook Link, Facebook Group Link & Yahoo! Group Link) into this folder. Simply clicking the Add Link button and off we go.

Here you will be asked to fill in some blanks which consists of Title, Description and URL.
For the Title :
- Write down your Links name.
eg. Blog, Facebook, Facebook Group or Yahoo! Group.
For the Description :
- Write down your name + Blog/Facebook/Facebook Group/Yahoo! Group at the back of your name.
eg. Ahmad Zaki Osman's Blog.
For the URL :
- Just paste your designated Blog / Facebook / Facebook Group / Yahoo! Group URL here.
eg. http://a139384s2k2.blogspot.com.
As you have finished with that just click the Add Link button.

And here it is the result. You now have successfully created a Link in your folder. If let say you wanted to add more links in your folder just repeat the above Step II.

| If you have done it correctly you should have something like the above picture. Great isn't. Do you notice that they are three buttons at the right side of each links (the Edit, Delete and Cut button)? Well each of them have a very special task to be done. | Do say that you wanted to delete you links, just simply click the Delete button would do the trick. Or you wanted to edit or cut your links (that is you wanted to share or paste them somewhere else), clicking the Edit or Cut button respectively would be suffice. |